I did it. I mounted a Fanatec CSL DD (8Nm) to my aging Playseat Challenge. My friends called me insane. The subreddits warned of ‘catastrophic flex’. The first lap at Spa? It felt like holding an electric toothbrush trying to escape. Chaos.
But here’s my hot take: Almost any ‘lightweight’ or foldable rig can handle an 8-15Nm DD wheelbase. You just need to know where to push, bolt, and reinforce. The standard design is a compromise. You’re going to break that compromise.
This isn’t theory. This is a trench warfare guide, born from failed 3D prints, wrong bolts, and eventually, rock-solid stability. Let’s get into it.
Why Your Current Mount Probably Sucks
Let’s be real. These rigs were built for Logitech G29s (2.1 Nm) and Thrustmaster T300s (3.9 Nm). Gentle forces. The mounts are often a single layer of metal or, worse, thick plastic. They cling to the core principle of ‘foldability’, not ‘immovability’.
A DD wheelbase works differently. It doesn’t just pull; it pushes, vibrates, and snaps with sudden feedback. Those forces hunt for the weakest point. Usually, it’s the vertical flex where the wheel deck attaches to the main tube. Sometimes it’s the horizontal wobble of the entire frame. You feel it as a vague, inaccurate oversteer, like the wheel is fighting itself.
Terrible.
The Big Three: Playseat Challenge, NLR Wheel Stand 2.0, and the Rest
We’re targeting the most common victims. The principles apply to almost anything.
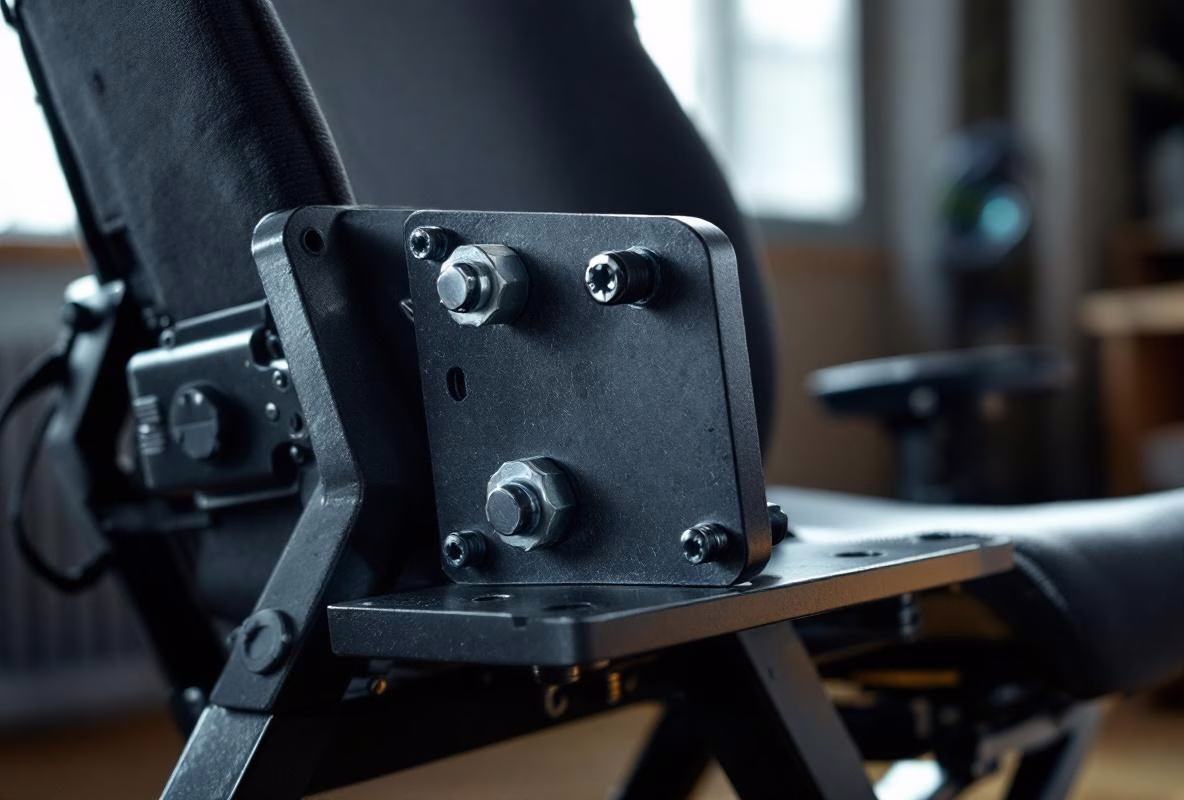
The Playseat Challenge: The Ultimate Test
Ah, the classic. The canvas throne. It’s actually quite well designed… for anything but DD forces. The biggest culprit? That plastic elbow joint where the wheel deck bar meets the seat section. It groans under strain.
What you gotta do:
- Reinforce that elbow. Source a metal ‘repair plate’ or a sturdy L-bracket. Bolt it over the existing plastic joint with short, thick bolts. The goal is to spread the flex across a larger metal surface. Just drilling extra screws into the plastic makes it weaker.
- The wheel plate itself. The default plate is a joke. Replace it. Companies like Lowdown Shifter (and others) sell CNC-cut replacement plates from 5-6mm thick aluminium. Bolt it on, and suddenly you have a solid platform. Not cheap, but it changes everything.
- The ‘karate-chop’ effect. When you brake hard, the whole frame wants to tilt forward. Strap a sturdy belt or use a ratchet strap between the lower frame and the back of your desk chair (or the wall). Seriously. It’s a low-budget hack that works.
The Next Level Racing Wheel Stand 2.0: The Almost-Rig
This one is stronger. Much stronger. But it has one infamous weakness: the horizontal pivot of the wheel post. Where the vertical column slides into the horizontal tube. Under high torque, that can develop play and cause an annoying horizontal ‘wobble’.
The fix:
- The clamp is your friend. Crank that big black clamping handle really, really tight. Don’t be gentle. Use a rubber mallet for an extra tap if you have to. You want that joint so tight the metal sighs.
- Shim it. If there’s still play, you need a shim. Cut a piece of soda can or use a thin strip of plastic. Wrap it around the vertical column before inserting it into the horizontal tube. This fills microscopic gaps.
- Width is stability. Make sure the stand’s legs are fully splayed out. The wider the base, the less it wants to rock under side forces.
Other Lightweight Cockpits (GT Omega, etc.)
The principle is identical: find the joint. Is it a bolt connecting multiple tubes? Is the wheel plate only attached at two points? Those are your weak spots. Reinforce them with extra brackets, or (better yet) replace the default wheel plate with a thicker, wider third-party one.
Hardware: Bolts, Nuts, and Avoiding Disaster
This is where DIY projects die. You can have the best plate in the world, but if you use the wrong bolts, it’ll fly apart.
- Bolt size is sacred. Measure the holes in your DD wheelbase. Usually M6. Use grade 8.8 or higher bolts. No hardware store junk.
- Plate thickness is king. That nice new aluminium plate? 5mm is the absolute minimum for 8-12Nm. For 15Nm, aim for 6-8mm if you can. More mass = less vibration.
- Don’t forget the nuts. Always use washers and locknuts or nylock nuts. Regular nuts will shake loose from vibration. I’ve seen it. It’s not pretty.
- Loctite 243 (Blue). Your new religion. A drop on any bolt thread that doesn’t need regular removal. It stops vibration from undoing everything.
The Uncomfortable Truth About Torque
You bought a 15Nm wheelbase. Congrats. You’re never going to run it at 15Nm on these rigs. And that’s okay.
The magic of DD is in the speed and detail, not just the brute strength. Set your base to 60-70% in the software profile. Your rig will thank you, your arms will thank you, and your lap times will probably improve because you’re not fighting a shaking mess. More isn’t always better.
My Recommended Upgrade Path (If You Have to Choose)
- First: Reinforce your rig’s existing joints (check bolts, add brackets). Costs almost nothing.
- Then: Upgrade the wheel plate to a thick, third-party option. This is the single biggest gain.
- Finally: Consider a rig-replacing solution like the Next Level Racing Wheel Stand DD or the GT Omega Apex. Those are designed for these forces. But that’s a bigger leap.
It boils down to this: your lightweight rig is a great starting point. It’s not a death sentence for DD. It’s an invitation to tinker. To understand how forces work. To build a setup that fits your space and budget perfectly.
So get your drill. Buy the right bolts. And silence that flex. The feeling when it’s finally solid? Priceless.
Good luck.